
For a couple of years I have had a tear out of this chalkboard from Restoration Hardware. My inner 'frugalista' would not allow me to spend $499 on a chalkboard. But I knew that I could build one on my own. So finally this week, I bit the bullet and decided to do it. And she is glorious! I still consider myself an amateur woodworker, so it is not perfect. But it actually turned out even better than I anticipated!

I figured if I liked it, someone else would probably like to build their own as well, so below is a tutorial.
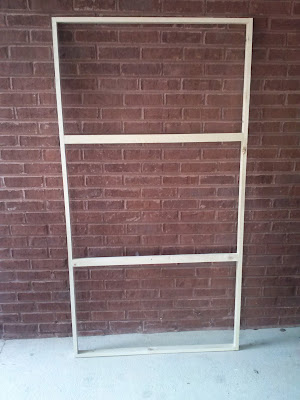
To get the project started I had to create a frame as a base. For the longest, I felt stumped as to what do. I finally settled on building a frame out of 1x2's. These pieces were attached with screws. The outside lengths are on edge so that the 3/4" edge is showing. I did this so that I could later attach outer trim. The two inside lengths are flat and flush with the front of the frame. I did this so that it would better support the hardboard that I would later attach. My frame was 36"x 68". If I were to build another one, I would add another support so that they were closer to 16" apart. These were spaced about 23" apart.
I then attached a 36" x 68" sheet of quarter-inch (1/4") hardboard to the frame to serve as the chalkboard surface. I used a nail gun and 1 1/4" nails to attach it. I also used regular wood glue on the back as well. This is where I ran into my first problem. I got the hardboard cut at the store, but it was off by about 3/16th of an inch. I wanted my outside trim to lie flush with frame, so I ended up buying a piece of trim that was 1/4"thick and the same width as my frame and just applied it to the overhanging edge.


Not too shabby for two days of work.
Cost breakdown:
3ct 1x 2 x 6 whitewood, for frame $10
4x8 sheet 1/4" hardboard $ 9
chalkboard paint (on hand) $ 0
'Provincial' Minwax stain (on hand) $ 0
1x3's(one 8' length, two 6' lengths) for outer trim $17
3 ct 8' lengths of 3 1/4" base molding $21
Total Cost $57
So, if you have been eyeing those chalkboards, or just love a good DIY, give it a try! And if you do, tag me on Instagram @oakhousedesignco! I'm off to hang this in the playroom.
Update: The chalkboard is finished off and hung up. Check out how!
Linking up to Beth's Tutorials and Tips Link Party at Home Stories A to Z. Thanks Beth for the feature in 10 Tutorials and Tips Not to Miss!
Read More

I figured if I liked it, someone else would probably like to build their own as well, so below is a tutorial.
To get the project started I had to create a frame as a base. For the longest, I felt stumped as to what do. I finally settled on building a frame out of 1x2's. These pieces were attached with screws. The outside lengths are on edge so that the 3/4" edge is showing. I did this so that I could later attach outer trim. The two inside lengths are flat and flush with the front of the frame. I did this so that it would better support the hardboard that I would later attach. My frame was 36"x 68". If I were to build another one, I would add another support so that they were closer to 16" apart. These were spaced about 23" apart.

I then attached a 36" x 68" sheet of quarter-inch (1/4") hardboard to the frame to serve as the chalkboard surface. I used a nail gun and 1 1/4" nails to attach it. I also used regular wood glue on the back as well. This is where I ran into my first problem. I got the hardboard cut at the store, but it was off by about 3/16th of an inch. I wanted my outside trim to lie flush with frame, so I ended up buying a piece of trim that was 1/4"thick and the same width as my frame and just applied it to the overhanging edge.

Next it was time to apply the chalkboard paint. I let the first coat dry for two hours and the second coat overnight.

The next day I went back to the store to buy trim. Before cutting trim, I 'seasoned' the chalkboard by rubbing chalk all over it. I was a bit worried about the roller lines showing, but they weren't really noticeable once the paint dried. And after 'seasoning' the board, I can't see them at all.

So now was time to add trim. Here is where I ran into another problem. Now the problem is that I was using a mini-miter saw. The problem is it has a 7 1/2" blade and can only cut short widths of wood. So I kept getting cuts that looked like this. ( I know this a footwear violation!)

The solution was to use a coping saw to cut off that little bit of tooth. Please tell me I am not the only one who has these problems when doing DIY!

I stained all of the wood before attaching it. I used 1x3 clear pine for the outer trim. This was attached with a nail gun to the original frame. The outer trim was nailed using 1 1/4" nails and regular wood glue. Then I attached 3 1/4" pine baseboard molding to the inside face of the chalkboard. Since I wasn't going to be using any nails on the face trim, I used a liquid nails glue and applied two beads.


After that I let it dry a bit and stood back and took a look.
Cost breakdown:
3ct 1x 2 x 6 whitewood, for frame $10
4x8 sheet 1/4" hardboard $ 9
chalkboard paint (on hand) $ 0
'Provincial' Minwax stain (on hand) $ 0
1x3's(one 8' length, two 6' lengths) for outer trim $17
3 ct 8' lengths of 3 1/4" base molding $21
Total Cost $57
So, if you have been eyeing those chalkboards, or just love a good DIY, give it a try! And if you do, tag me on Instagram @oakhousedesignco! I'm off to hang this in the playroom.
Update: The chalkboard is finished off and hung up. Check out how!


